CHAPTER 3
|
|
CHAPTER 3 |
1 2 3 4 5 6 HOME | ||
| Combat & Situational Awareness | |||||
IN THIS CHAPTER
Air To Air Combat - Helicopters
Air To Air Combat - Fast Movers
Infantry - Manpads
Dual Cockpit View Memory
Padlock Waypoint Multipurpose
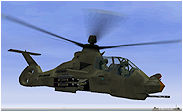
3.1 Air To Air Combat - Helicopters
Success in helicopter air-to-air combat requires putting your nose (and hence weapon systems) onto the target while denying the enemy the same privilege. Helicopters are not very fast and don't have the speed to run away from fights once they have begun. Either you use available terrain to mask an escape - or you stand and fight.
There are basic rules to keep in mind when engaging in air-to-air combat. Some of which are covered in this chapter.
Remember
The best attack position is above and behind on the six-o'clock
Ambush your foe wherever possible, the terrain of Enemy Engaged allows a pilot to exploit landscape features such as small depressions, dried up riverbeds, gullies and saddles. You can hide in such locations and wait for enemy helicopters to pass-by. Once an enemy exposes their rear, unmask, lock on with the helmet mounted sight (HMS), close to within 0.5km from above and use the cannon. That is the ideal situation and terribly sneaky hence satisfying for a combat helo pilot.
AI entities will not actively engage you if you are not perceive as a threat or their mission target. If they are on Combat Air Patrol or have been called in by other forces that perceive you as a threat force then expect some form of response.
Usually firing at an enemy AI will alert them immediately to your intentions and respond if they are able to do so (they could be out of ammunition or fixated on another target).
Often you can easily sneak up behind a flight of enemy helicopters and start blasting at near point-blank range.
A Hellfire or Vikhr missile has enough explosive power to destroy two or three helicopters with one good hit. If your targets wingmen are close, they will be caught in the blast. Laser guided weapons work best, these are difficult to spoof.
3.11 Close In - Gunfights
Most of the time computer AI aircraft engage with missiles and not the cannon, so the following section mostly applies to combat with human pilots.
Helicopter cannons are mounted in such a way they shoot DOWN and have little positive travel in the vertical axis. An enemy will find it much much harder to aim the cannon on a target above them. In order to do so the pilot will be forced to raise the nose of the helicopter thus slowing the helicopter down (bleeding energy) and most likely gaining altitude risking exposure to surface to air threats. A helicopter doing this can become a sitting duck but it is often the best defence against single fighters which will be discussed later.
In a close-in flight, helicopters with a turreted nose cannon have a clear advantage. The victor will be the first who can achieve a good gun track. A steady burst of 20 or 30mm cannon rounds at close range will bring down or severely cripple a helicopter.
Ambush your foe wherever possible, the terrain of Comanche Hokum allows a pilot to exploit small depressions and gullies. You can hide in these locations and wait for enemy helicopters to pass-by. Once they expose their rear, unmask, lock on using the helmet mounted sight (HMS) close to within 0.5km and use the cannon.
The moment you open fire, your opponents will begin a tight turn to respond - but it should be already too late.
Head-On Closure - "Crossing the Stream"
In a head-on engagement, your opponent is located between your 10 to 2 o'clock position. If you within cannon range of 1.5km and are out in the open you should press the attack.
To determine if an AI entity is engaging you, switch to "Player Target" view - look at the object text, if you see "Task Attacking" and the noes of the aircraft is facing away from the screen then that is a sure sign the AI is coming for you. This view always orients so that you are in the middle of the screen in the background and the target in front.
All cannon fire is shot in bursts of varying duration depending on the shooter. It is aimed directly towards the target - thus if a target helicopter is flying directly away or towards incoming fire, from the shooters point of view the target is not moving. A non-moving target is very easy to hit.
You can drastically reduce the Pk (probability of kill) by "crossing the stream", flying at or near perpendicular to the incoming fire. Speed is essential, that puts air between where you ARE and where you WERE. And incoming cannon shells are aimed at where you WERE.
Verses the Hokum - "Cross & Close"
Flying against the Ka-50/52 presents another opportunity. The Cannon is mounted on the starboard side and has limited travel - the arc to the port side is blocked by the nose of the helicopter. Therefore approaches on this side of the helicopter are effectively masked forcing the Hokum pilot to pedal turn (something which the Ka-50/52 can do rather rapidly) towards the attacker.
But as the range and offset between the attacker and the Hokum decreases, the angle of turn required for the Hokum to bring guns to bare changes steeply forcing a faster turn. This has the same net effect as "Crossing the Steam".
Crossing from the right to the left of the Hokum affords another advantage, a turreted cannon can return fire throughout the manoeuvre.
3.2 Air To Air Combat - Fast Movers
By far the most dangerous of air threats is the enemy fighter. Their high speed allows them to approach, engage and extend out of range of your air to air missile systems. Your helicopters air search radar can take several seconds to conduct a full 360-degree sweep. In that time, the enemy aircraft can cover a maximum of 2km before you even know it’s there.
The best way to stay alive is simply avoid direct confrontation with enemy fighters, particularly air superiority fighters.
A single attack helicopter against a single fighter is a winnable situation, engaging two fighters is pushing the odds, however ground attack fighters are much more vulnerable than air superiority or multi-role fighter aircraft. An engagement against more than two fighters without support from friendly units and you are seriously outgunned. Face facts - there are situations that should be avoided, getting into a furball against six Mig-29s and Su-33s is one of them.
Avoid "Kill" or "Danger Zones"
The most dangerous areas are near enemy airbases or "hot" areas of enemy activity. Examining trends can identify "Hot" areas, how often fighters are observed patrolling those areas. Killing zones around enemy airbases are particularly dangerous.
When an engagement in this danger area has begun, it’s quite probable that additional air support is being readied at the nearby airbase. Given your proximity to the base you will have little time to "get out of Dodge" before reinforcements arrive, this is what makes the area so dangerous. In fact this zone can extend up to 32km from an enemy airbase (effective radio range).
Defensive Positioning and Air Combat Manoeuvring
While fighters are formidable opponents the well-flown attack helicopter is not defenceless. The helicopter has a major turning advantage.
If the terrain allows the pilot should elect to deploy to cover, hiding in a terrain feature that masks the helicopter. From such a position it may be possible to call for help and slip away at NOE altitude.
However when terrain does not provide enough cover you may have to resort to more aggressive Manoeuvring.
A fighter requires that it position you on its nose for a missile or gunshot. The most dangerous place to be is within the 120 degree "funnel" extending out from the fighters’ nose. As the fighter approaches and closes to engage, the helicopter can turn into the fighter and dive, this closes the distance and manoeuvres you out of the "funnel". By turning into the fighter and diving, you force the fighter to increase its dive angle, the fighter pilot will have to break off earlier to escape from the manoeuvre.
Once the fighter has passed by it will attempt to extend and turn for a second pass leaving the fighter vulnerable for a few seconds. The danger here is that the attack helicopter bleeds too much speed while turning to track the passing fighter. If this happens the helicopter becomes and easy target while it is sitting in the air.
General rules are:
Turn into the fighter and dive.
Try and maintain high forward air speed
- Shoot 'em in the ass, with cannon as they pass - if possible.
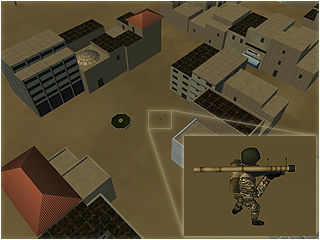
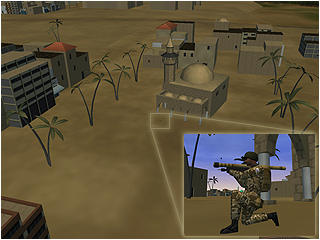
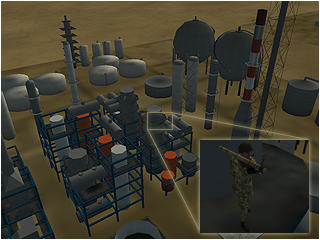
3.3 Infantry - MANPADS
Another threat you will have to deal with is the man portable air defence systems or MANPADS, namely infantry with SAMs. These are scattered all over, around factories, refineries, power-stations and in city streets. They tend to be located near landmarks, look out for small objects on the ground. Use your helmet mounted display to try and pick them up.
Example MANPAD locations...
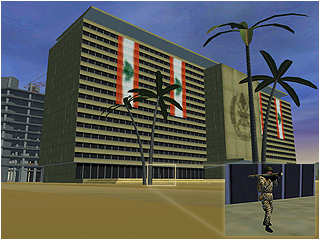
If you are flying over city streets and hear your ASE warning or your wingman suddenly expire, then you know you've got trouble with some of these guys.
3.4 Dual Cockpit View Memory
This simulation allows you to occupy either crew position. While there is no control functionality advantage to be gained from occupying a specific seat, each position has independently configurable MFDs.
The Moving Map display may be set to different ranges for the pilot and gunner.
The greatest advantage the dual cockpit system has to offer is that each position remembers your view mode. So the rear seat may use a "padlock" view (such as padlock waypoint) while the front seat is for general use, simply hitting the ESC key will toggle between the two views. This also extends to F3 & F4 zoomed MFD views. You can use this "view memory" to quickly switch between forward and heads down.
3.5 Padlock Waypoint - Multipurpose
ESCORT Missions
When escorting a flight, the "action" or "X" waypoint will always be the escorted flight. Use "Padlock Waypoint X" to quickly locate it.
Landing
After mission completion, the last waypoint will be your landing spot. Use "Padlock Waypoint" to find your landing matt / pad.
WARNING !!!
The pilot and CPG shall perform their armament safety check prior to entering the forward area refuelling point (FARP). Radio transmissions shall be limited to EMERGENCIES ONLY until refuelling has been completed.
| Enemy Engaged - Comanche vs Hokum Strategy Guide | |||